设计模式学习 一、面向对象设计原则(7原则) 我们在进行软件开发时,不仅需要将基本的业务给完成,还要考虑整个项目的可维护性和可复用性,我们开发的项目不单单需要我们自己来维护,也需要其他的开发者一起来进行共同维护,因此我们在编写代码时,应该尽可能的规范。如果我们在编写代码时不注重这些问题,随着项目的不断扩大,整体结构只会越来越糟。为了避免这种情况的发生,我们就可以使用设计模式
1、单一职责原则
一个对象应该只包含单一的职责,并且该职责被完整地封装在一个类中
比如:
1 2 3 4 5 6 7 8 9 10 11 12 13 14 15 16 17 18 19 20 21 public class People public void coding () System.out.println("人类会编程" ); } public void work () System.out.println("工厂打螺丝也会" ); } public void ride () System.out.println("送外卖也会" ); } }
这个People类啥都会,显然这个People太过臃肿,根据单一职责原则,我们需要进行更明确的划分:
1
2
3
4
5
6
7
8
9
10
11
12
13
14
15
16
17
18
19
20
class Coder public void coding () System.out.println("程序员会编程" ); } } class Worker public void work () System.out.println("工人会打螺丝" ); } } class Rider public void ride () System.out.println("骑手会送外卖" ); } }
我们将类的粒度进行近一步划分,以后在设计Mapper、Service、Controller时,根据不同的业务进行划分,都可以采用单一职责原则
2、开闭原则
软件实体应当对扩展开放,对修改关闭
比如:
1
2
3
4
5
6
7
8
9
10
11
12
13
14
15
16
17
18
19
20
21
22
23
24
25
public abstract class Coder public abstract void coding () class JavaCoder extends Coder @Override public void coding () System.out.println("Java太卷了" ); } } class PHPCoder extends Coder @Override public void coding () System.out.println("PHP是世界上最好的语言" ); } } class CCoder extends Coder @Override public void coding () System.out.println("底层还是得找我" ); } } }
不同的程序员可以自由地决定他们该如何进行编程,这是扩展开放;具体哪个程序员使用什么语言怎么编程,不需要其他程序员干涉,这是修改关闭
3、里氏替换原则
子类可以扩展父类的功能,但不能改变父类原有的功能
比如:
1
2
3
4
5
6
7
8
9
10
11
12
13
14
15
16
17
18
19
20
21
public abstract class Coder public void coding () System.out.println("我会打代码" ); } class JavaCoder extends Coder public void game () System.out.println("艾欧尼亚最强王者已上号" ); } public void coding () System.out.println("摆烂了,啊对对对" ); System.out.println("emo结束,继续卷" ); } } }
我们对父类的方法进行了重写,子类已经不具备父类的原本的行为,违背了里氏替换原则
正确的写法:
1
2
3
4
5
6
7
8
9
10
11
12
13
14
15
16
17
18
19
20
21
22
public abstract class People public abstract void coding () class Coder extends People @Override public void coding () System.out.println("我会打代码" ); } } class JavaCoder extends People public void game () System.out.println("艾欧尼亚最强王者已上号" ); } public void coding () System.out.println("摆烂了,啊对对对" ); } } }
4、依赖倒转原则
高层模块不应该依赖低层模块,二者都应该依赖接口
未使用依赖倒转原则:
1
2
3
4
5
6
7
8
9
10
11
12
13
14
15
16
17
18
19
public class DependencyReverse public static void main (String[] args) Person person = new Person(); person.receive(new Email()); } } class Email public String getInfo () return "电子邮件信息: hello,world" ; } } class Person public void receive (Email email) System.out.println(email.getInfo()); } }
采用接口实现依赖倒转:
1
2
3
4
5
6
7
8
9
10
11
12
13
14
15
16
17
18
19
20
21
22
23
24
25
26
27
28
29
public class DependencyReverse public static void main (String[] args) Person person = new Person(); person.receive(new Email()); person.receive(new Wechat()); } } interface IReceive public String getInfo () } class Email implements IReceive public String getInfo () return "电子邮件信息: hello,world" ; } } class Wechat implements IReceive public String getInfo () return "微信信息: hello,world--wechat" ; } } class Person public void receive (IReceive info) System.out.println(info.getInfo()); } }
5、接口隔离原则
对接口的细化
比如:
1
2
3
4
5
6
7
8
9
10
11
12
13
14
15
16
17
18
19
20
21
22
23
24
25
26
27
28
29
30
31
32
33
34
35
36
37
38
39
40
41
42
43
interface Device String getCpu () ; String getType () ; String getMemory () ; } class Computer implements Device @Override public String getCpu () return "i9-12900K" ; } @Override public String getType () return "电脑" ; } @Override public String getMemory () return "32G DDR5" ; } } class Fan implements Device @Override public String getCpu () return null ; } @Override public String getType () return "风扇" ; } @Override public String getMemory () return null ; } }
风扇不需要CPU和内存,我们要对其进行更细粒度的划分
1
2
3
4
5
6
7
8
9
10
11
12
13
14
15
16
17
18
19
20
21
22
23
24
25
26
27
28
29
30
31
32
33
34
35
36
interface SmartDevice String getCpu () ; String getType () ; String getMemory () ; } interface NormalDevice String getType () ; } class Computer implements SmartDevice @Override public String getCpu () return "i9-12900K" ; } @Override public String getType () return "电脑" ; } @Override public String getMemory () return "32G DDR5" ; } } class Fan implements NormalDevice @Override public String getType () return "风扇" ; } }
6、合成复用原则
优先使用对象组合,而不是通过继承来达到复用的目的
比如:
1
2
3
4
5
6
7
8
9
10
11
12
class A public void connectDatabase () System.out.println("我是连接数据库操作!" ); } } class B extends A public void test () System.out.println("我是B的方法,我也需要连接数据库!" ); connectDatabase(); } }
这样的代码耦合度太高,修改为:
1
2
3
4
5
6
7
8
9
10
11
12
class A public void connectDatabase () System.out.println("我是连接数据库操作!" ); } } class B public void test (A a) System.out.println("我是B的方法,我也需要连接数据库!" ); a.connectDatabase(); } }
7、迪米特法则
一个类对其他类交互越少越好,目的还是降低耦合度
比如:
1
2
3
4
5
6
7
8
9
10
11
12
13
14
15
16
public class Main public static void main (String[] args) throws IOException Socket socket = new Socket("localhost" , 8080 ); Test test = new Test(); test.test(socket); } static class Test public void test (Socket socket) System.out.println("IP地址:" +socket.getLocalAddress()); } } }
改进后:
1
2
3
4
5
6
7
8
9
10
11
12
13
public class Main public static void main (String[] args) throws IOException Socket socket = new Socket("localhost" , 8080 ); Test test = new Test(); test.test(socket.getLocalAddress()); } static class Test public void test (String str) System.out.println("IP地址:" +str); } } }
二、创建型(5种) 1、工厂方法模式
当我们需要对象时,直接调用工厂类中的工厂方法来为我们生成对象,而不是直接new一个对象。这样,就算类出现了变动,我们也只需要修改工厂中的代码即可,而不是大面积地进行修改
以前:
1
2
3
4
5
6
7
8
9
10
11
12
public abstract class Fruit private final String name; public Fruit (String name) this .name = name; } @Override public String toString () return name+"@" +hashCode(); } }
1
2
3
4
5
6
7
8
9
10
11
12
public class Apple extends Fruit public Apple () super ("苹果" ); } } public class Orange extends Fruit public Orange () super ("橘子" ); } }
1
2
3
4
5
6
public class Main public static void main (String[] args) Apple apple = new Apple(); System.out.println(apple); } }
现在:
1
2
3
public abstract class FruitFactory <T extends Fruit > public abstract T getFruit () }
1
2
3
4
5
6
public class AppleFactory extends FruitFactory <Apple > @Override public Apple getFruit () return new Apple(); } }
1
2
3
4
5
public class Main public static void main (String[] args) System.out.println(new AppleFactory()::getFruit); } }
2、抽象工厂模式
工厂方法模式只适用于简单对象,当我们需要多个产品族的时候,就需要抽象工厂模式
比如小米产品线上生产小米手机、小米平板、小米路由;华为产品线上生产华为手机、华为平板、华为路由;Apple产品线上生产iPhone、iPad、AirPort
按工厂方法模式,需要创建手机工厂、平板工厂、路由器工厂,然后分别实现三个产品子工厂,共9个工厂
使用抽象工厂模式后:
1
2
3
4
5
public abstract class AbstractFactory public abstract Phone getPhone () public abstract Table getTable () public abstract Router getRouter () }
这样只需要创建三个产品族子工厂即可
3、建造者模式
我们通过建造者来不断配置参数或是内容,当我们配置完所有内容后,最后再进行对象的构建
以前:
1
2
3
4
5
6
7
8
9
10
11
12
13
14
15
16
17
18
19
public class Student int id; int age; int grade; String name; String college; String profession; List<String> awards; public Student (int id, int age, int grade, String name, String college, String profession, List<String> awards) this .id = id; this .age = age; this .grade = grade; this .name = name; this .college = college; this .profession = profession; this .awards = awards; } }
1
2
3
public static void main (String[] args) Student student = new Student(1 , 18 , 3 , "小明" , "计算机学院" , "计算机科学与技术" , Arrays.asList("ICPC-ACM 区域赛 金牌" , "LPL 2022春季赛 冠军" )); }
参数太多,我们得一个个对应着去填,不小心可能把参数填到错误的位置
现在:
1
2
3
4
5
6
7
8
9
10
11
12
13
14
15
16
17
18
19
20
21
22
23
24
25
26
27
28
29
30
31
32
33
34
35
36
37
38
39
40
41
42
43
44
public class Student ... private Student (int id, int age, int grade, String name, String college, String profession, List<String> awards) ... } public static StudentBuilder builder () return new StudentBuilder(); } public static class StudentBuilder int id; int age; int grade; String name; String college; String profession; List<String> awards; public StudentBuilder id (int id) this .id = id; return this ; } public StudentBuilder age (int age) this .age = age; return this ; } ... public StudentBuilder awards (String... awards) this .awards = Arrays.asList(awards); return this ; } public Student build () return new Student(id, age, grade, name, college, profession, awards); } } }
1
2
3
4
5
6
7
8
9
public static void main (String[] args) Student student = Student.builder() .id(1 ) .age(18 ) .grade(3 ) .name("小明" ) .awards("ICPC-ACM 区域赛 金牌" , "LPL 2022春季赛 冠军" ) .build(); }
这样赋值的方式就比以前优雅多了,lombok提供了@Builder注解,可以直接使用建造者模式
4、单例模式
只有一个实例对象,SpringBoot采用的就是单例模式 singleton
饿汉式 ,对象在一开始类加载的时候就创建好了
1
2
3
4
5
6
7
8
9
public class Singleton private final static Singleton INSTANCE = new Singleton(); private Singleton () public static Singleton getInstance () return INSTANCE; } }
懒汉式 ,当我们需要获取对象时,才进行检查并创建
1
2
3
4
5
6
7
8
9
10
11
12
public class Singleton private static Singleton INSTANCE; private Singleton () public static Singleton getInstance () if (INSTANCE == null ) { INSTANCE = new Singleton(); } return INSTANCE; } }
在多线程环境下,如果三条线程同时调用 getInstance() 方法,会导致对象被多次创建,因此需要对懒汉式的写法做一些改进,加上锁
1
2
3
4
5
6
7
8
public static Singleton getInstance () if (INSTANCE == null ) { synchronized (Singleton.class) { INSTANCE = new Singleton(); } } return INSTANCE; }
不过这样还不完美,因为这样还是有可能多个线程同时判断为null而进入等锁的状态,这样还是会导致对象被多次创建,所以,我们还得加一层内层判断
1
2
3
4
5
6
7
8
public static Singleton getInstance () if (INSTANCE == null ) { synchronized (Singleton.class) { if (INSTANCE == null ) INSTANCE = new Singleton(); } } return INSTANCE; }
即使这样,我们还缺少了一项内容,我们要添加一个 volatile 给 INSTANCE,INSTANCE的作用是让对象在线程之间可见,这样其他线程才会拿 INSTANCE 的最新值去判断
5、原型模式
通过原对象拷贝创建新对象
浅拷贝 :对于类中基本数据类型,会直接复制值给拷贝对象;对于引用类型,只会复制对象的引用
1
2
3
4
5
6
7
8
9
public static void main (String[] args) int a = 10 ; int b = a; System.out.println(a == b); Object o = new Object(); Object k = o; System.out.println(o == k); }
深拷贝 :将原对象拷贝成新的对象,我们可以使用 Cloneable 接口实现深拷贝
1
2
3
4
5
6
7
8
9
10
11
12
13
14
15
16
17
public class Student implements Cloneable String name; public Student (String name) this .name = name; } public String getName () return name; } @Override public Object clone () throws CloneNotSupportedException return super .clone(); } }
1
2
3
4
5
public static void main (String[] args) throws CloneNotSupportedException Student student0 = new Student("小明" ); Student student1 = (Student) student0.clone(); System.out.println(student0.getName() == student1.getName()); }
虽然Student对象成功拷贝,但是其内层对象并没有进行拷贝,依然只是对象引用的复制,所以Java为我们提供的 clone 方法只会进行浅拷贝
1
2
3
4
5
6
@Override public Object clone () throws CloneNotSupportedException Student student = (Student) super .clone(); student.name = new String(name); return student; }
这里我们改进一下,对成员变量也进行拷贝,就实现了深拷贝
三、结构型(7种) 1、适配器模式
比如Macbook为了轻薄全是type-c的接口,而我们现在需要使用usb口,这时需要买一个扩展坞,这实际上就是一种适配模式
1
2
3
4
5
6
7
8
9
10
11
public class TestSupplier public String supply () return "iPhone 14 Pro" ; } } public interface Target String supply () ; }
1
2
3
4
5
6
7
8
9
10
public class Main { public static void main(String[] args) { TestSupplier supplier = new TestSupplier(); test( ? ); } public static void test(Target target){ //test方法只支持手机供应商接口,但是我们想要传入TestSupplier手机供应商类,使用其中的supply方法 System.out.println("成功得到:"+target.supply()); } }
这时:
1
2
3
4
5
6
7
8
9
10
11
12
13
public class TestAdapter implements Target TestSupplier supplier; public TestAdapter (TestSupplier supplier) this .supplier = supplier; } @Override public String supply () return supplier.doSupply(); } }
1
2
3
4
5
6
7
8
public static void main (String[] args) TestAdapter adapter = new TestAdapter(); test(adapter); } public static void test (Target target) System.out.println("成功得到:" +target.supply()); }
2、桥接模式
买奶茶时,我们需要确认大中小杯、什么配料,不同类型的奶茶都要去创建一个类。桥接模式就是,将奶茶的类型作为最基本的抽象类,然后对尺寸、配料等属性进行桥接
以前:
1
2
3
4
5
6
7
8
9
10
11
12
13
14
15
16
17
18
19
20
21
22
23
public interface Tea String getType () ; } public interface Size String getSize () ; } public class LargeKissTea implements Tea , Size @Override public String getSize () return "大杯" ; } @Override public String getType () return "芋圆啵啵奶茶" ; } }
现在:
1
2
3
4
5
6
7
8
9
10
11
12
13
14
public abstract class AbstractTea private Size size; public AbstractTea (Size size) this .size = size; } public abstract String getType () public String getSize () return size.getSize(); } }
我们需要为Size创建子类:
1
2
3
4
5
6
7
public class Large implements Size @Override public String getSize () return "大杯" ; } }
创建芋圆啵啵奶茶子类:
1
2
3
4
5
6
7
8
9
10
public class KissTea extends AbstractTea public KissTea (Size size) super (size); } @Override public String getType () return "芋圆啵啵奶茶" ; } }
1
2
3
4
5
public static void main (String[] args) KissTea tea = new KissTea(new Large()); System.out.println(tea.getType()); System.out.println(tea.getSize()); }
3、组合模式
使用 Employee 类来创建和打印员工的层次结构,打印所有员工
创建 Employee 类,该类带有 Employee 对象的列表
1
2
3
4
5
6
7
8
9
10
11
12
13
14
15
16
17
18
19
20
21
22
23
24
25
26
27
28
29
30
31
32
public class Employee private String name; private String dept; private int salary; private List<Employee> subordinates; public Employee (String name,String dept, int sal) this .name = name; this .dept = dept; this .salary = sal; subordinates = new ArrayList<Employee>(); } public void add (Employee e) subordinates.add(e); } public void remove (Employee e) subordinates.remove(e); } public List<Employee> getSubordinates () return subordinates; } public String toString () return ("Employee :[ Name : " + name +", dept : " + dept + ", salary :" + salary+" ]" ); } }
使用 Employee 类来创建和打印员工的层次结构
1
2
3
4
5
6
7
8
9
10
11
12
13
14
15
16
17
18
19
20
21
22
23
24
25
26
27
28
29
30
31
32
33
public class CompositePatternDemo public static void main (String[] args) Employee CEO = new Employee("John" ,"CEO" , 30000 ); Employee headSales = new Employee("Robert" ,"Head Sales" , 20000 ); Employee headMarketing = new Employee("Michel" ,"Head Marketing" , 20000 ); Employee clerk1 = new Employee("Laura" ,"Marketing" , 10000 ); Employee clerk2 = new Employee("Bob" ,"Marketing" , 10000 ); Employee salesExecutive1 = new Employee("Richard" ,"Sales" , 10000 ); Employee salesExecutive2 = new Employee("Rob" ,"Sales" , 10000 ); CEO.add(headSales); CEO.add(headMarketing); headSales.add(salesExecutive1); headSales.add(salesExecutive2); headMarketing.add(clerk1); headMarketing.add(clerk2); System.out.println(CEO); for (Employee headEmployee : CEO.getSubordinates()) { System.out.println(headEmployee); for (Employee employee : headEmployee.getSubordinates()) { System.out.println(employee); } } } }
执行结果:
1
2
3
4
5
6
7
Employee :[ Name : John, dept : CEO, salary :30000 ] Employee :[ Name : Robert, dept : Head Sales, salary :20000 ] Employee :[ Name : Richard, dept : Sales, salary :10000 ] Employee :[ Name : Rob, dept : Sales, salary :10000 ] Employee :[ Name : Michel, dept : Head Marketing, salary :20000 ] Employee :[ Name : Laura, dept : Marketing, salary :10000 ] Employee :[ Name : Bob, dept : Marketing, salary :10000 ]
4、装饰模式
对现有的类进行装饰
1
2
3
public abstract class Base public abstract void test () }
1
2
3
4
5
6
public class BaseImpl extends Base @Override public void test () System.out.println("我是业务方法" ); } }
现在的实现类太单调了,我们加一点装饰上去:
1
2
3
4
5
6
7
8
9
10
11
12
13
public class Decorator extends Base protected Base base; public Decorator (Base base) this .base = base; } @Override public void test () base.test(); } }
1
2
3
4
5
6
7
8
9
10
11
12
13
public class DecoratorImpl extends Decorator{ //装饰实现 public DecoratorImpl(Base base) { super(base); } @Override public void test() { //对原本的方法进行装饰,我们可以在前后都去添加额外操作 System.out.println("装饰方法:我是操作前逻辑"); super.test(); System.out.println("装饰方法:我是操作后逻辑"); } }
实现装饰模式:
1
2
3
4
5
6
public static void main (String[] args) Base base = new BaseImpl(); Decorator decorator = new DecoratorImpl(base); decorator.test(); }
5、代理模式
对现有的类进行代理
实现代理模式:
1
2
3
public abstract class Subject public abstract void test () }
1
2
3
4
5
6
7
public class SubjectImpl extends Subject @Override public void test () System.out.println("我是测试方法!" ); } }
代理类:
1
2
3
4
5
6
7
8
9
10
11
12
13
14
15
public class Proxy extends Subject Subject target; public Proxy (Subject subject) this .target = subject; } @Override public void test () System.out.println("代理前绕方法" ); target.test(); System.out.println("代理后绕方法" ); } }
代理模式和装饰模式很像,不同的在于思想。装饰模式强调增强自身;代理模式强调让别人帮你做事情,比如记录日志、设置缓存等
6、外观模式
比如我们需要吃饭,需要做买菜、煮菜、吃饭的准备,但是现在我们通过门面统一来完成,这就是外观模式
1
2
3
4
5
public class SubSystemA public void test1 () System.out.println("买菜" ); } }
1
2
3
4
5
public class SubSystemB public void test2 () System.out.println("煮菜" ); } }
1
2
3
4
5
public class SubSystemC public void test3 () System.out.println("吃饭" ); } }
我们添加一个门面:
1
2
3
4
5
6
7
8
9
10
11
12
public class Facade SubSystemA a = new SubSystemA(); SubSystemB b = new SubSystemB(); SubSystemC c = new SubSystemC(); public void havaLunch () a.test1(); b.test2(); c.test3(); } }
1
2
3
4
public static void main (String[] args) Facade facade = new Facade(); facade.havaLunch(); }
使用外观模式简化了流程
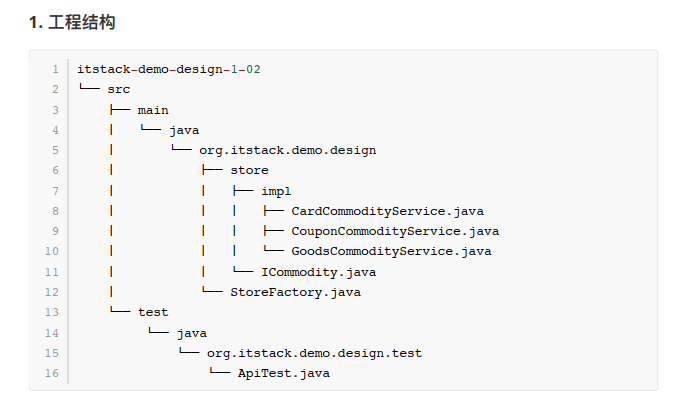
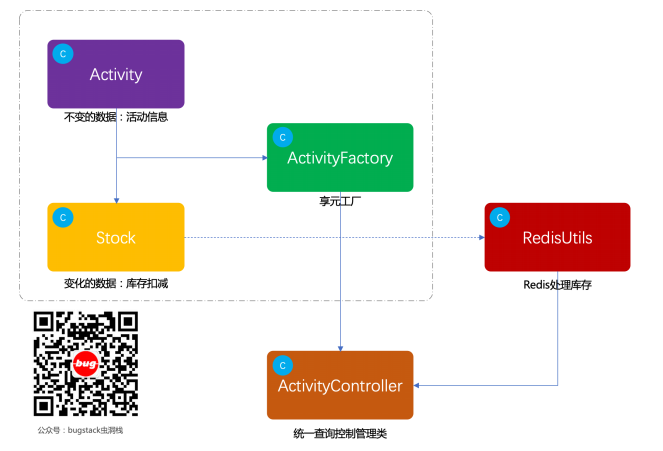
7、享元模式
将重复出现的内容作为共享部分取出。比如现在我们有两个服务,但是他们都需要使用数据库工具类来操作,实际上这个工具类没必要创建多个,我们这时就可以使用享元模式,让数据库工具类作为享元类
1
2
3
4
5
public class DBUtil public void selectDB () System.out.println("我是数据库操作..." ); } }
1
2
3
4
5
6
7
public class DBUtilFactory private static final DBUtil UTIL = new DBUtil(); public static DBUtil getFlyweight () return UTIL; } }
我们想要使用数据库,直接找享元工厂
1
2
3
4
5
6
7
public class UserService public void service () DBUtil util = DBUtilFactory.getFlyweight(); util.selectDB(); } }
四、行为型(11种) 1、解释器模式
该设计模式比较少使用,就是对我们的语言进行解释
比如我们输入:1+2*3,最后得到结果7,这就是解释器模式
2、模板方法模式
在程序中,某些操作是固定的,而有些操作需要视情况而定,由不同的子类实现,这时要用到模板方法模式
比如:
1 2 3 4 5 6 7 8 9 10 11 12 13 14 15 16 17 18 19 20 public abstract class AbstractDiagnosis public void test () System.out.println("今天头好晕,不想起床,开摆,先跟公司请个假" ); System.out.println("去医院看病了~" ); System.out.println("1 >> 先挂号" ); System.out.println("2 >> 等待叫号" ); this .prescribe(); this .medicine(); } public abstract void prescribe () public abstract void medicine () }
1 2 3 4 5 6 7 8 9 10 11 12 13 14 public class ColdDiagnosis extends AbstractDiagnosis @Override public void prescribe () System.out.println("3 >> 没有感冒" ); } @Override public void medicine () System.out.println("4 >> 开点头孢回去吃吧" ); } }
1
2
3
4
public static void main (String[] args) AbstractDiagnosis diagnosis = new ColdDiagnosis(); diagnosis.test(); }
看病的逻辑已经由父类定义好了,所以子类只需要实现需要实现的部分即可,这样我们就实现了简单的模板方法模式
3、责任链模式
使用责任链模式来模拟一个简单的面试过程,按一面二面三面这样走的流程
1
2
3
4
5
6
7
8
9
10
11
12
13
14
15
16
17
18
public abstract class Handler protected Handler successor; public Handler connect (Handler successor) this .successor = successor; return successor; } public void handle () this .doHandle(); Optional .ofNullable(successor) .ifPresent(Handler::handle); } public abstract void doHandle () }
1
2
3
4
5
6
7
8
9
public class FirstHandler extends Handler @Override public void doHandle () System.out.println("============= 一面 ==========" ); System.out.println("1. 谈谈你对static关键字的理解?" ); System.out.println("2. 内部类可以调用外部的数据吗?如果是静态的呢?" ); System.out.println("3. hashCode()方法是所有的类都有吗?默认返回的是什么呢?" ); } }
1
2
3
4
5
6
7
8
9
10
public class SecondHandler extends Handler @Override public void doHandle () System.out.println("============= 二面 ==========" ); System.out.println("1. 如果我们自己创建一个java.lang包并且编写一个String类,能否实现覆盖JDK默认的?" ); System.out.println("2. HashMap的负载因子有什么作用?变化规律是什么?" ); System.out.println("3. 线程池的运作机制是什么?" ); System.out.println("4. ReentrantLock公平锁和非公平锁的区别是什么?" ); } }
1
2
3
4
5
6
7
8
9
10
public class ThirdHandler extends Handler @Override public void doHandle () System.out.println("============= 三面 ==========" ); System.out.println("1. synchronized关键字了解吗?如何使用?底层是如何实现的?" ); System.out.println("2. IO和NIO的区别在哪里?NIO三大核心组件?" ); System.out.println("3. TCP握手和挥手流程?少一次握手可以吗?为什么?" ); System.out.println("4. 操作系统中PCB是做什么的?运行机制是什么?" ); } }
编写好每一轮的面试流程,我们就可以构建一个责任链
1
2
3
4
5
6
7
public static void main (String[] args) Handler handler = new FirstHandler(); handler .connect(new SecondHandler()) .connect(new ThirdHandler()); handler.handle(); }
4、命令模式
比如现在我们有很多的类,彩电、冰箱、空调等,我们要通过一个遥控器去控制他们,就需要将控制这些电器的指令都给设计好,而且还不能有太强的关联性
所有的电器都是接收者:
1
2
3
public interface Receiver void action () }
我们要控制这些电器,那么肯定需要一个指令才能控制:
1
2
3
4
5
6
7
8
9
10
11
12
public abstract class Command private final Receiver receiver; protected Command (Receiver receiver) this .receiver = receiver; } public void execute () receiver.action(); } }
创建一个遥控器:
1
2
3
4
5
public class Controller public static void call (Command command) command.execute(); } }
创建一个空调:
1
2
3
4
5
6
public class AirConditioner implements Receiver @Override public void action () System.out.println("空调已开启,呼呼呼" ); } }
创建一个开启空调的命令:
1
2
3
4
5
public class OpenCommand extends Command public OpenCommand (AirConditioner airConditioner) super (airConditioner); } }
通过遥控器开启空调:
1
2
3
4
public static void main (String[] args) AirConditioner airConditioner = new AirConditioner(); Controller.call(new OpenCommand(airConditioner)); }
5、迭代器模式
通过迭代器进行集合的遍历
1
2
3
4
5
6
public static void main (String[] args) List<String> list = Arrays.asList("AAA" , "BBB" , "CCC" ); for (String s : list) { System.out.println(s); } }
编译后使用的是迭代器实现
1
2
3
4
5
6
7
8
9
public static void main (String[] args) List<String> list = Arrays.asList("AAA" , "BBB" , "CCC" ); Iterator var2 = list.iterator(); while (var2.hasNext()) { String s = (String)var2.next(); System.out.println(s); } }
6、中介者模式
程序中可能会出现很多的对象,这些对象之间的调用关系错综复杂,可能一个对象要做上面事情就得联系好几个对象。这时如果设置一个中间人,只需要联系中间人即可
比如:
1
2
3
4
5
6
7
8
9
10
11
public class Mediator private final Map<String, User> userMap = new HashMap<>(); public void register (String address, User user) userMap.put(address, user); } public User find (String address) return userMap.get(address); } }
用户有两种角色,一种是租房,一种是出租
1
2
3
4
5
6
7
8
9
10
11
12
13
14
15
16
17
18
public class User String name; String tel; public User (String name, String tel) this .name = name; this .tel = tel; } public User find (String address, Mediator mediator) return mediator.find(address); } @Override public String toString () return name+" (电话:" +tel+")" ; } }
1
2
3
4
5
6
7
8
9
10
11
12
13
public static void main (String[] args) User user0 = new User("刘女士" , "10086" ); User user1 = new User("李先生" , "10010" ); Mediator mediator = new Mediator(); mediator.register("成都市武侯区天府五街白马程序员" , user0); User user = user1.find("成都市武侯区天府五街下硅谷" , mediator); if (user == null ) System.out.println("没有找到对应的房源" ); user = user1.find("成都市武侯区天府五街白马程序员" , mediator); System.out.println(user); }
中介者模式优化了原有的复杂多对多关系,而是将其简化为一对多的关系
7、备忘录模式
为我们的软件提供了一个可回溯的时间节点,可能我们程序在运行过程中某一步出现了错误,这时我们就可以回到之前某个节点重新来过
学生对象:
1
2
3
4
5
6
7
8
9
10
11
12
13
14
public class Student private String currentWork; private int percentage; public void work (String currentWork) this .currentWork = currentWork; this .percentage = new Random().nextInt(100 ); } @Override public String toString () return "我现在正在做:" +currentWork+" (进度:" +percentage+"%)" ; } }
状态保存类:
1
2
3
4
5
6
7
8
9
public class State final String currentWork; final int percentage; State(String currentWork, int percentage) { this .currentWork = currentWork; this .percentage = percentage; } }
实现状态的保存和恢复:
1
2
3
4
5
6
7
8
9
10
11
12
13
14
public class Student ... public State save () return new State(currentWork, percentage); } public void restore (State state) this .currentWork = state.currentWork; this .percentage = state.percentage; } ... }
1
2
3
4
5
6
7
8
9
10
11
12
13
public static void main (String[] args) Student student = new Student(); student.work("学Java" ); System.out.println(student); State savedState = student.save(); student.work("打游戏" ); System.out.println(student); student.restore(savedState); System.out.println(student); }
8、观察者模式
当对象发生改变时,观察者能够立刻观察到并进行一些联动操作
观察者接口:
1
2
3
public interface Observer void update () }
1
2
3
4
5
6
7
8
9
10
11
public class Subject private final Set<Observer> observerSet = new HashSet<>(); public void observe (Observer observer) observerSet.add(observer); } public void modify () observerSet.forEach(Observer::update); } }
1
2
3
4
5
6
7
public static void main (String[] args) Subject subject = new Subject(); subject.observe(() -> System.out.println("我是一号观察者!" )); subject.observe(() -> System.out.println("我是二号观察者!" )); subject.modify(); }
9、状态模式
水在不同的温度下呈现不同的状态,这就是状态模式
我们来设计一个学生类,然后学生的学习方法会根据状态不同而发生改变,我们先设计一个状态枚举:
1 2 3 public enum State NORMAL, REST }
1 2 3 4 5 6 7 8 9 10 11 12 13 14 15 16 17 18 19 20 21 public class Student public class Student private State state; public void setState (State state) this .state = state; } public void study () switch (state) { case REST: System.out.println("学累了,我去休息一会儿" ); break ; case NORMAL: System.out.println("好好学习,天天向上" ); break ; } } }
1
2
3
4
5
6
7
8
public static void main (String[] args) Student student = new Student(); student.setState(State.NORMAL); student.study(); student.setState(State.LAZY); student.study(); }
10、策略模式
为对象设定一种策略,之后对象的行为就按这个策略执行。跟刚刚说的状态模式有点像,区别在于策略模式由我们指定,状态模式是运行过程中自动切换
策略模式其实我们以前也遇到过,比如线程池的各种策略,拒绝策略、抛弃策略、抛弃最老策略等
1
2
3
4
5
6
7
8
9
10
11
12
13
14
15
16
public static void main (String[] args) ThreadPoolExecutor executor = new ThreadPoolExecutor(1 , 1 , 10 , TimeUnit.SECONDS, new SynchronousQueue<>(), new ThreadPoolExecutor.AbortPolicy()); Runnable runnable = () -> { try { TimeUnit.SECONDS.sleep(60 ); } catch (InterruptedException e) { throw new RuntimeException(e); } }; executor.execute(runnable); executor.execute(runnable); }
11、访问者模式
不同的访问者对某一件事务的处理可能不同
比如我们日以继夜地努力,终于在某某比赛赢得了冠军,而不同的访问者对这份荣誉有不同的反应
1
2
3
4
5
6
7
8
9
10
11
12
13
14
15
16
17
public class Prize String name; String level; public Prize (String name, String level) this .name = name; this .level = level; } public String getName () return name; } public String getLevel () return level; } }
访问者接口:
1
2
3
public interface Visitor void visit (Prize prize) }
1
2
3
4
5
6
7
public class Teacher implements Visitor @Override public void visit (Prize prize) System.out.println("你得了什么奖?" +prize.name); System.out.println("你得了几等奖?" +prize.level); } }
1
2
3
4
5
6
7
public class Family implements Visitor @Override public void visit (Prize prize) System.out.println("孩子,辛苦了,有没有好好照顾自己啊" ); System.out.println("你得了什么奖啊?" +prize.name+",很不错,要继续加油啊!" ); } }
访问者模式将奖项本身的属性和对于奖项的不同操作进行了分离
小傅哥设计模式 创建型模式
1、工厂方法模式
2、结构型模式 3、建造者模式 4、原型模式 5、单例模式 懒汉、饿汉、线程是否安全、静态类、内部类、加锁、串行化
结构型模式 6、适配器模式 7、桥接模式 8、组合模式 9、装饰器模式 10、外观模式 11、享元模式
12、代理模式 行为模式 13、责任链模式 14、命令模式 15、迭代器模式 16、中介者模式 17、备忘录模式 18、策略模式 19、模板模式 20、访问者模式 2024.1.28已完结!