介绍RabbitMq的基本使用
一、环境安装
linux可以基于Docker安装,windows本机安装即可
二、配置主题
登录 RabbitMQ 管理后台:http://127.0.0.1:15672/#/ (opens new window)- 账密:admin/admin
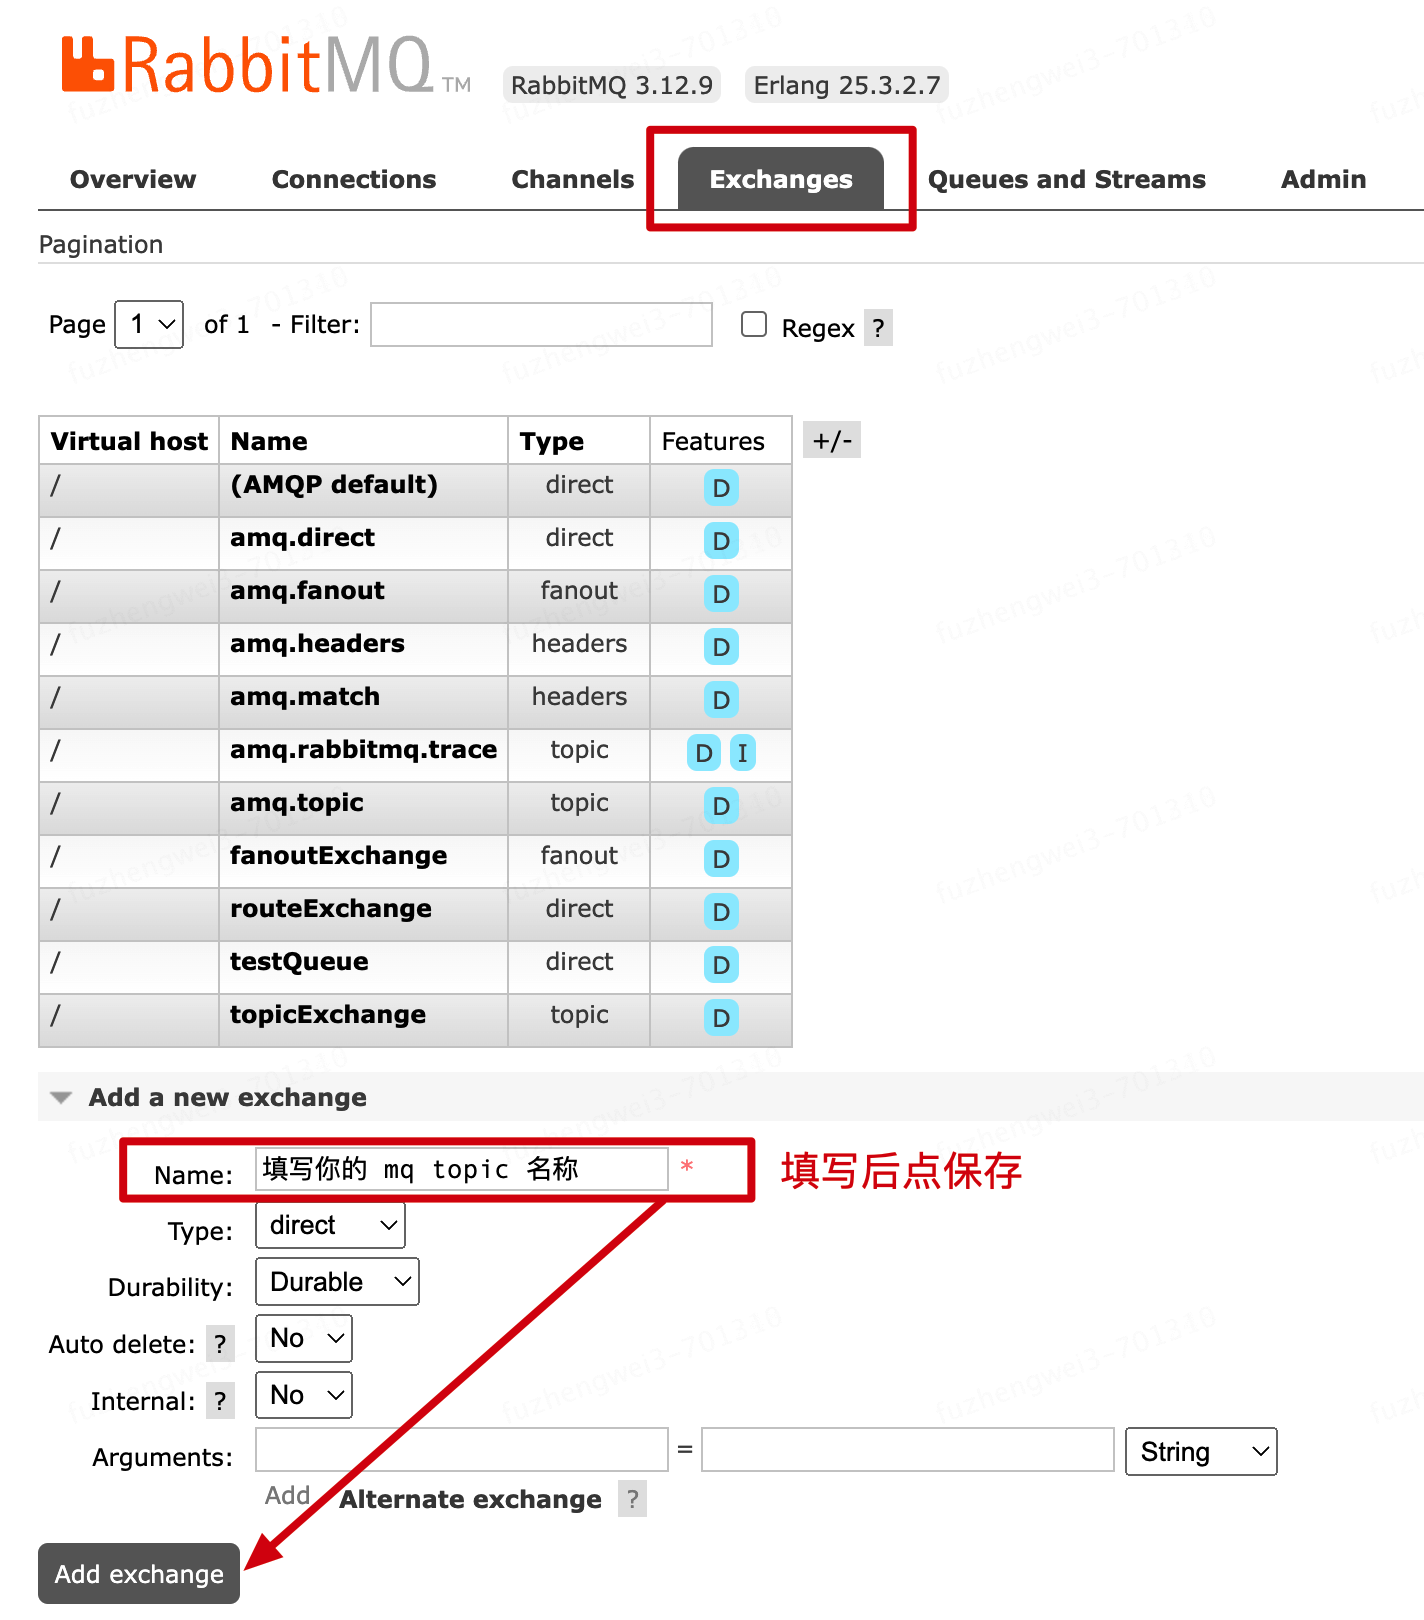
![img]()
进入到后台以后,先如图配置个主题消息,后面会使用到这个主题发送和监听消息信息。
三、测试案例
1. yml 配置
文件:application-dev.yml
1
2
3
4
5
6
7
8
9
10
| spring:
rabbitmq:
addresses: 127.0.0.1
port: 5672
username: admin
password: admin
listener:
simple:
prefetch: 1
|
- 测试前,需要在工程中添加 RabbitMQ 连接配置信息。
- prefetch 是消息投递的数量,实际场景可以适当配置的大一些。
2. 消费配置
进入到 xfg-dev-tech-trigger 是监听 MQ 消息的地方。
2.1 普通消息
1
2
3
4
5
6
7
8
9
10
11
12
13
14
15
16
17
| @Slf4j
@Component
public class Customer {
@RabbitListener(queuesToDeclare = @Queue(value = "testQueue"))
public void listener(String msg) {
log.info("接收消息:{}", msg);
}
}
|
- 异常可以随着你的测试开启,开启后会接收到重试的消息。
2.2 广播消息
1
2
3
4
5
6
7
8
9
10
11
12
13
14
15
16
17
18
| @Slf4j
@Component
public class FanoutCustomer {
@RabbitListener(
bindings = @QueueBinding(
value = @Queue(value = "fanoutCustomer"),
exchange = @Exchange(
value = "fanoutExchange",
type = ExchangeTypes.FANOUT
)
)
)
public void listener(String msg) {
log.info("接收消息【广播模式】:{}", msg);
}
}
|
2.3 路由消息
1
2
3
4
5
6
7
8
9
10
11
12
13
14
15
16
17
18
19
20
21
22
23
24
25
26
27
| @Slf4j
@Component
public class RouteCustomer {
@RabbitListener(
bindings = @QueueBinding(
value = @Queue(value = "routeQueue1"),
exchange = @Exchange(value = "routeExchange", type = ExchangeTypes.DIRECT),
key = "routeKey1"
)
)
public void listener01(String msg) {
log.info("接收消息【路由模式】:{}", msg);
}
@RabbitListener(
bindings = @QueueBinding(
value = @Queue(value = "routeQueue2"),
exchange = @Exchange(value = "routeExchange", type = ExchangeTypes.DIRECT),
key = "routeKey2"
)
)
public void listener02(String msg) {
log.info("接收消息【路由模式】:{}", msg);
}
}
|
- 路由模式,会根据实际发送消息时候路由选择配置,让指定的消费方接收消息。比如实际场景中有监听订单的消息,但订单有很多种,比如自营、三方以及不同支付渠道,那么可以让不同的监听者只收取自己的消息信息。
2.3 通配符消息
1
2
3
4
5
6
7
8
9
10
11
12
13
14
15
16
17
18
19
20
21
22
23
24
25
26
27
28
29
30
31
32
33
34
35
36
37
38
| @Slf4j
@Component
public class TopicCustomer {
@RabbitListener(
bindings = @QueueBinding(
value = @Queue(value = "topicQueue1"),
exchange = @Exchange(value = "topicExchange", type = ExchangeTypes.TOPIC),
key = "topic.*" // `*`:匹配一个单词,就只有一个单词
)
)
public void listener01(String msg) {
log.info("接收消息【通配符模式】listener01:{}", msg);
}
@RabbitListener(
bindings = @QueueBinding(
value = @Queue(value = "topicQueue2"),
exchange = @Exchange(value = "topicExchange", type = ExchangeTypes.TOPIC),
key = "topic.#" // `#`:匹配一个或多个词
)
)
public void listener02(String msg) {
log.info("接收消息【通配符模式】listener02:{}", msg);
}
@RabbitListener(
bindings = @QueueBinding(
value = @Queue(value = "topicQueue3"),
exchange = @Exchange(value = "topicExchange", type = ExchangeTypes.TOPIC),
key = "topic.y.#" // `#`:匹配一个或多个词
)
)
public void listener03(String msg) {
log.info("接收消息【通配符模式】listener03:{}", msg);
}
}
|
- 通配符可以起到过滤的作用,比如在实际场景中,你需要根据过往mq的类型,做部分的监听。那么可以根据通配符配置来搞定。
四、测试验证
1
2
3
4
5
6
7
8
9
10
11
12
13
14
15
16
17
18
19
20
21
22
23
24
25
26
27
28
29
30
31
32
33
34
35
36
37
38
39
40
| @Slf4j
@RunWith(SpringRunner.class)
@SpringBootTest
public class ApiTest {
@Autowired
private RabbitTemplate rabbitTemplate;
@Test
public void test_product() throws InterruptedException {
rabbitTemplate.convertAndSend("testQueue", "基本消息");
new CountDownLatch(1).await();
}
@Test
public void test_product_fanout() throws InterruptedException {
rabbitTemplate.convertAndSend("fanoutExchange", "", "广播消息");
new CountDownLatch(1).await();
}
@Test
public void test_product_route() throws InterruptedException {
rabbitTemplate.convertAndSend("routeExchange", "routeKey1", "路由模式,消息1");
rabbitTemplate.convertAndSend("routeExchange", "routeKey2", "路由模式,消息2");
new CountDownLatch(1).await();
}
@Test
public void test_product_topic() throws InterruptedException {
rabbitTemplate.convertAndSend("topicExchange", "topic.x", "通配符模式,消息1");
rabbitTemplate.convertAndSend("topicExchange", "topic.y.z", "通配符模式,消息2");
new CountDownLatch(1).await();
}
}
|
1
2
3
4
5
6
7
8
| 22:29:46.792 [org.springframework.amqp.rabbit.RabbitListenerEndpointContainer#0-1] INFO Customer - 接收消息:基本消息
22:30:40.525 [org.springframework.amqp.rabbit.RabbitListenerEndpointContainer#1-1] INFO FanoutCustomer - 接收消息【广播模式】:广播消息
22:31:27.117 [org.springframework.amqp.rabbit.RabbitListenerEndpointContainer#3-1] INFO RouteCustomer - 接收消息【路由模式】:路由模式,消息2
22:31:27.117 [org.springframework.amqp.rabbit.RabbitListenerEndpointContainer#2-1] INFO RouteCustomer - 接收消息【路由模式】:路由模式,消息1
10:32:08.359 [org.springframework.amqp.rabbit.RabbitListenerEndpointContainer#6-1] INFO TopicCustomer - 接收消息【通配符模式】listener03:通配符模式,消息2
10:32:08.359 [org.springframework.amqp.rabbit.RabbitListenerEndpointContainer#4-1] INFO TopicCustomer - 接收消息【通配符模式】listener01:通配符模式,消息1
10:32:08.359 [org.springframework.amqp.rabbit.RabbitListenerEndpointContainer#5-1] INFO TopicCustomer - 接收消息【通配符模式】listener02:通配符模式,消息1
10:32:08.372 [org.springframework.amqp.rabbit.RabbitListenerEndpointContainer#5-1] INFO TopicCustomer - 接收消息【通配符模式】listener02:通配符模式,消息2
|
- 以上案例,分别测试;基本消息、广播消息、路由消息、通配符消息。